
To create the company, just enter the company name, address and other details, such as financial year, security, and base currency information. Once you have created your company, based on your business preferences, you can use the accounting, inventory, payroll, and taxation features. You can also specify the tax registration details as applicable, such as GST, VAT, Excise, TCS, or TDS, which can be accounted for your transactions.
Security : All the business transactions that you maintain in the company remain safe. You can enable additional security options for your company to prevent unauthorised access to your transaction records.
If you have more than one user accessing your company, you can set up security for each user based on their role
You can create an account in Tally.ERP 9 for each user. Based on the user's roles, you can access to the tasks the user can perform.
Say you want to allow a data entry operator to make only transaction entries. You do no want this user to access your financial reports, such as Balance Sheet and P&L. However, you want the user to be able to do back-dated entries when needed. All of these can be done in Tally.ERP 9 by creating a user account for the data entry operator role and assigning the necessary rights.
Similarly, you can create more accounts if you want to maintain multiple users. See Security and User Profiles to know more about security rights and user roles.
Multiple companies : Do you have more than one business? If yes, you can create multiple companies in Tally.ERP 9, maintain transactions separately for each business, and also manage the returns for each company accordingly.
Group company : If you are maintaining multiple companies, you can get a consolidated view of such business reports by using the Group Company feature. Viewing the financial reports separately for each business and consolidating the accounts manually can be a tedious task.
Once you have set up your company in Tally.ERP 9 based on your business requirements, you can record and manage your day-to-day transactions, and track them - even remotely.
Topics we will learn here:
● Create Company to Maintain Business Transactions
● Alter Company to Update Company Details
● Update Financial Year to Allow Back-Dated Transaction Entries
● Set/Remove Security Settings to Ensure Authorised Access to Company
● Set Up Base Currency for Transactions
Maintain Business Transactions | Create a Company
You need to create a company to keep record of all your business transactions and view related financial reports. To create the company, just enter the company name and address and update other details, such as contact and financial year information.
1. On launching Tally.ERP 9, select Create Company .
If you already have one company open and would like to create another company, press Alt + F3 (Cmp Info) > Create Company .
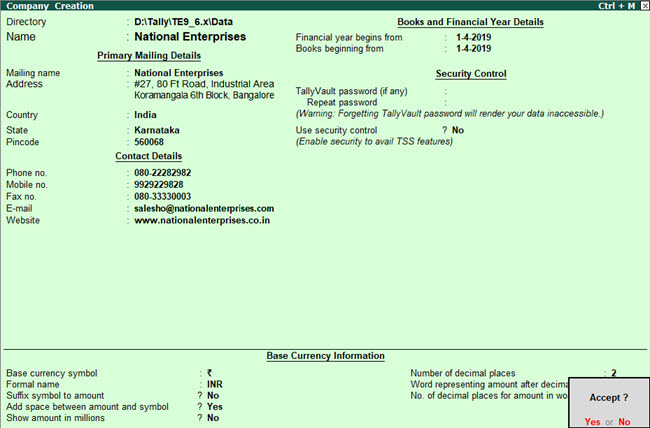
2. Provide the Company details.
● Enter the Name , Mailing name , and Address .
Note: By default, your company data will be saved in the location specified under Directory , which is the same as the folder where Tally.ERP 9 is installed. For more information on configuring your Directory path, refer to Data Configuration.
● Enter the State , Country , and other contact details. A sample image is shown below. These details can be printed on your invoice, if needed.
Country
and
State
: The
Country
field is prefilled depending on the country specified during installation
of Tally.ERP 9. Select the country applicable to your business and
then select the
State
. If
you do not see the State or Country that your business operates from,
you can create the State or Country in the application on the fly
and select the same. Ensure that your base currency is appropriate.
Telephone , Mobile , and E-mail : You can configure your bills to include these contact details and print them so that your clients can contact you when needed. You can provide your website address to have it printed on your bills. Your customers can go to your website to know about your products and services in detail.
At this point, you can press Ctrl + A to save the details and create the company. You can set up the remaining company details (steps 3 and 4 below) anytime later.
Note : The name of new union territory Dadra & Nagar Haveli and Daman & Diu is provided in Release 6.6.3 . All masters with Daman & Diu and Dadra & Nagar Haveli are automatically updated with the name of new union territory. The state/union territory name before merger is captured in State (before reorganisation) field. Retaining the pre-merger state/union territory name helps in managing transactions and tax returns from that period.
3. Set up financial year details and security options.
● Financial year begins from : Tally.ERP 9 pre-fills this field based on the date settings of your computer and the Country selected in the Company Creation screen.
For example, if your
computer date is set to 11-02-2020 and the region is set to India,
the financial year is pre-filled as 01-04-2019. If you update the
company's country as UAE in Tally.ERP 9, keeping the computer date
as is, the financial year for the company is automatically set to
01-01-2020. This is because, Tally.ERP 9 considers the computer date
and the financial period applicable for the selected country and updates
the
Financial year beginning from
field accordingly.
● Books beginning from : By default, Tally.ERP 9 fills this field with the Financial year begins from date. You can update this, as needed.
Say you started your business and have maintained all business transactions since 1-Oct-2019. You can update the Books beginning from date to 1-Oct-2019, while the financial year will be 1-Apr-2019.
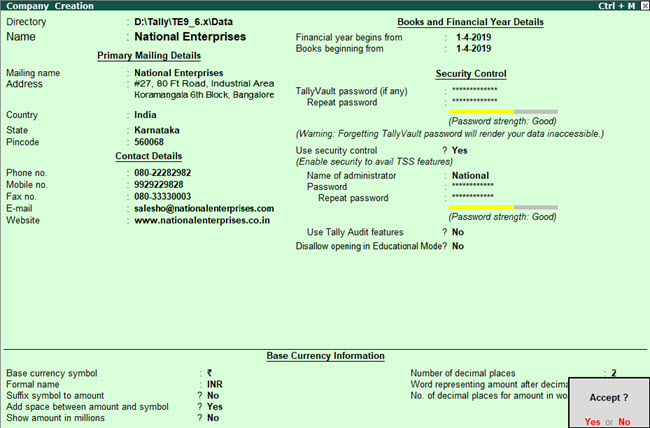
● Security Control : This is optional. You can enable security features such as TallyVault and User controls for your company anytime later.
a) TallyVault : If you do not want the company name to be displayed in Tally.ERP 9 while selecting the company, you can specify a TallyVault password for your company. This encrypts your company and therefore ensures privacy of the company data. You can access this company only if you know this password. This password cannot be retrieved, if lost.
b) User Access : You can allow authorised user access to your company by setting up a username and password for the company. Which means, next time you select the company, you will need to provide this username and password to open the company data. For different users, you can set up different user credentials for controlled access of your company. Refer to the Security Controls topic for details on managing users and access rights.
4. Specify the Base Currency Information . You can set up the base currency depending on the currency used in your business to record transactions.
● Base currency symbol : Based on the Country you selected, the base currency symbol is filled with the currency applicable for that country. If your business deals with a different base currency, update this field accordingly.
● Formal name : The name of the currency specified.
● Suffix symbol to amount : In the case of certain countries, the currency symbol is placed after the numeral. For example, Yen is specified after the number as 5000 Yen.
● Add space between amount and symbol : Enable this option if you require space between amount and symbol.
● Show amount in millions : This is useful for companies, which require reporting of the financial statements in millions.
● Number of decimal places : This is set to 2, by default. However, it can be specified up to 4 places.
● Word representing amount after decimal : The name of the decimal portion of amount appears based on the country selected. For example, if India is selected as the country and Number of decimal places is entered, then paise appears by default.
● No. of decimal places for amount in words : You can specify the number of decimal places for printing the amount in words. This number should be equal to or lesser than the number specified in the field No. of decimal places for amount in words .
If your business includes transactions in multiple currencies, refer to the Multi-currency topic.
5. Accept the Company Creation screen. As always, you can press Ctrl + A to save.
After you have created the company, in the Gateway of Tally screen, under Name of Company , the company name appears in bold.
Do you have multiple businesses to track and manage? You can create as many companies in Tally.ERP 9 and manage your business transactions in each company separately.
If you also prefer to get a consolidated view of the health of multiple businesses or submit summarised reports for auditing purpose, you can use the Group Company feature in Tally.ERP 9.
Load the company
Once you have created a company, you can load the company in one of the following ways:
Select the company
● Open Tally.ERP 9 > Select Company > and select the company from the List of Companies .
Configure Tally.ERP 9
If you wish Tally.ERP 9 to load the company whenever you open Tally.ERP 9
1. Gateway of Tally > F12 (Configure) > Data Configuration .
2. Set Load companies on startup to Yes .
3. Select companies to preload on startup : You can select one or more companies to get loaded based on your choice, when you open Tally.ERP 9 next time onwards.
For more information, see Data Configuration .
In Tally.ERP 9, you can configure the buffering time to load a company. See more...
1. Open the Tally.ini file located in the Tally folder.
2. Go to the option Load Buffering . Set this option to:
o Yes - To reduce the time take to open the reports. The company data will take a little longer to open as it considers the database of opening and closing balances of ledgers and stock items.
o No - To reduce the time taken to open the company data. The reports will take a little longer to open as the database of opening and closing balances of ledgers and stock items were not considered while opening the company data.
Update Company Details | Alter Company
If your company address, phone number, or any other contact information was not provided earlier or has changed, you can update such details in Tally.ERP 9. Any changes made to these details will be reflected accordingly in your reports and printed invoices.
1. Gateway of Tally > press Alt + F3 (Cmp Info) > Alter .
2. In the Company Alteration screen, make the necessary changes.
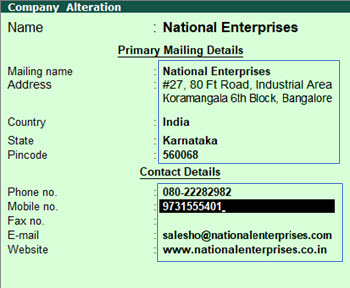
3. Accept the changes. As always, press Ctrl + A to save.
If you do not need the company anymore, you can delete the company as well.
1. Gateway of Tally > Alt + F3 (Cmp Info) > Alter .
2. In the Company Alteration screen, press Alt + D . The company will be deleted permanently.
If you want to access the business transactions recorded in the company at a later time, you can take a backup of the company before you delete it. Note that once you delete the company, you cannot retrieve it, and therefore keeping a back up of the company data is recommended.
Allow Back-Dated Transaction Entries | Update Financial Year
If you have maintained your books of accounts prior to the current financial year, you can add all of the back-dated transactions to your company in Tally.ERP 9. Let us assume that you started your business in 1-Jun-2018 and have maintained your business transactions since then. However, you created a company in Tally.ERP 9 on 1-May-2019. By default, the books and financial years in Tally.ERP 9 are both set to 1-Apr-2019. To allow entries of transactions in Tally.ERP 9 starting 1-Jun-2018, you will need to update the financial year information of the company.
1. Gateway of Tally > Alt + F3 (Cmp Info) > Alter .
2. In the Company Alteration screen, update the Financial year begins from as 1-Apr-2018 and the Books beginning date as 1-Jun-2018.
3. Accept the changes. As always, press Ctrl + A to save.
You can change the Books beginning date in the Company Alteration screen anytime to make back-dated entries up to 1-Apr-2018 for the financial year 2018-2019.
Important : In Tally.ERP 9, if the financial year and books beginning date are already set to 1-Apr-2018, and you alter the dates to 1-Apr-2019, all transactions recorded during the period 1-Apr-2018 and 31-Mar-2019 will be lost. However, if you need to maintain transactions separately from 1-Apr-2019, considering splitting your company to avoid data loss. Refer to the Splitting Company Data based on Financial Years topic for more information.
Ensure Authorised Access to Company | Set/Remove Security Settings
Security of business transactions and financial reports is critical, especially to avoid misuse or unauthorised access. Tally.ERP 9 helps you set up security for your company and change the credentials when required. Based on your business practice, you can enable the security feature by altering the company in Tally.ERP 9.
In this section
● Set/Alter Security Control
● Remove Security Control
● TallyVault
Set/Alter Security Control
1. Gateway of Tally > Alt + F3 (Cmp Info) > Alter .
2. To set the security control options.
● Set Use security control to Yes .
● Name of administrator and Password : The credentials you specify here must be entered every time you open your company.
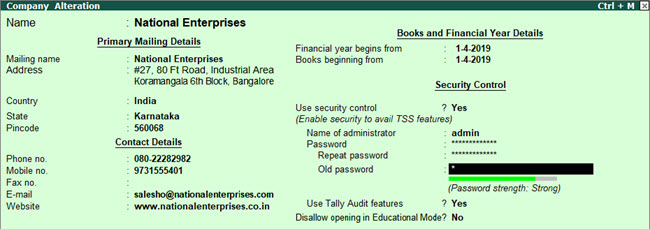
3. Accept the changes. As always, you can press Ctrl + A to save.
● Use Tally Audit features : Tally Audit allows the administrator or an auditor profile user to track changes in the accounting information.
● Disallow opening in educational mode : Set this option to Yes , if you do not want the company to be opened in the educational mode. In the educational mode, you can record transactions only on the first and last day of a month.
● On accepting the company creation screen, if you have specified TallyVault password, Tally.ERP 9 prompts you to enter the user name and password.
Once you have saved the company, you can alter the credentials anytime later. To do so:
1. Open the company by entering the Name of User and Password .
2. In Gateway of Tally > click Alt+F3 (Cmp Info) > Alter .
3. Select the company.
4. You can change the administrator name, or the password or both.
● To alter only the name of administrator:
o Security Control > enter a new Name of administrator .
o Enter the existing password in all the password fields.
● To alter only the password:
o Security Control > enter the existing Name of administrator .
o Enter a new Password , and repeat it in the Repeat Password field.
o Enter the Old password .
● To alter both the administrator name and the password
o Enter a new Name of administrator and a new Password .
o Enter the Old password .
When altering security setting, providing the old password ensures that an authorised user is attempting to alter the credentials of the company.
Remove Security Control
1. In Gateway of Tally > click Alt+F3 (Cmp Info) > Alter .
2. Select the company.
3. Set the option Use security control to No .
4. Enter the existing password in the Current/Existing Password field.
5. Accept the changes. As always, you can press Ctrl + A to save.
TallyVault
Based on your business environment, if you want to maintain privacy of the company that you have created in Tally.ERP 9, use TallyVault. Providing a TallyVault password encrypts your company and all the transaction details, including the company name. Next time you open your company, you will need to first enter this password to view the company name and other details.
TallyVault is an enhanced security system that allows encryption of your company data. Encryption involves converting normally accessible Tally information into unrecognizable information, which can only be reconverted by authorised persons.
● While creating the company in Tally.ERP 9, you can set the TallyVault password.
● If you had already set the TallyVault password and would like to alter it, use Gateway of Tally > Alt + F3 (Cmp Info) > Change TallyVault .
For more information, refer to Enable TallyVault.
Note: If you have specified credentials for security control and the TallyVault password, next time you open the company, you will need to first enter the TallyVault Password and then the security credentials.
Use Currency as Applicable for Transactions | Set Up Base Currency
Currency details for your company are pre-filled based on the country that you have selected during company creation. If your business is set up in India, the base currency is by default set to Rupees. All the transactions that you record and the reports that you view in Tally.ERP 9 will show the values in the base currency that is set for your company. If your business is set up in India but you have customers from a different country, you can specify the base currency as applicable for that country.
1. Gateway of Tally > Alt + F3 (Cmp Info) > Alter .
2. Base Currency Symbol : For example, ₹ for Rupee, AED for United Arab Emirates (UAE), and so on.
Based on the currency you choose, you can update the remaining options applicable to that currency. For example, if you have chosen AED as the base currency,
o Update the Formal name to Dirham .
o Set Suffix symbol to amount to Yes , because the AED always appears after the number (for example, 5000 AED).
Similarly, update the other options as applicable for the currency chosen.

3. Accept the changes. As always, press Ctrl + A to save.
Multi-currency : If your business has customers in more than one country or you need to maintain transactions in different currencies, you can use multiple currencies in Tally.ERP 9. For more information, refer to the Multi-currency in Tally.ERP 9 topic.


No comments:
Post a Comment